
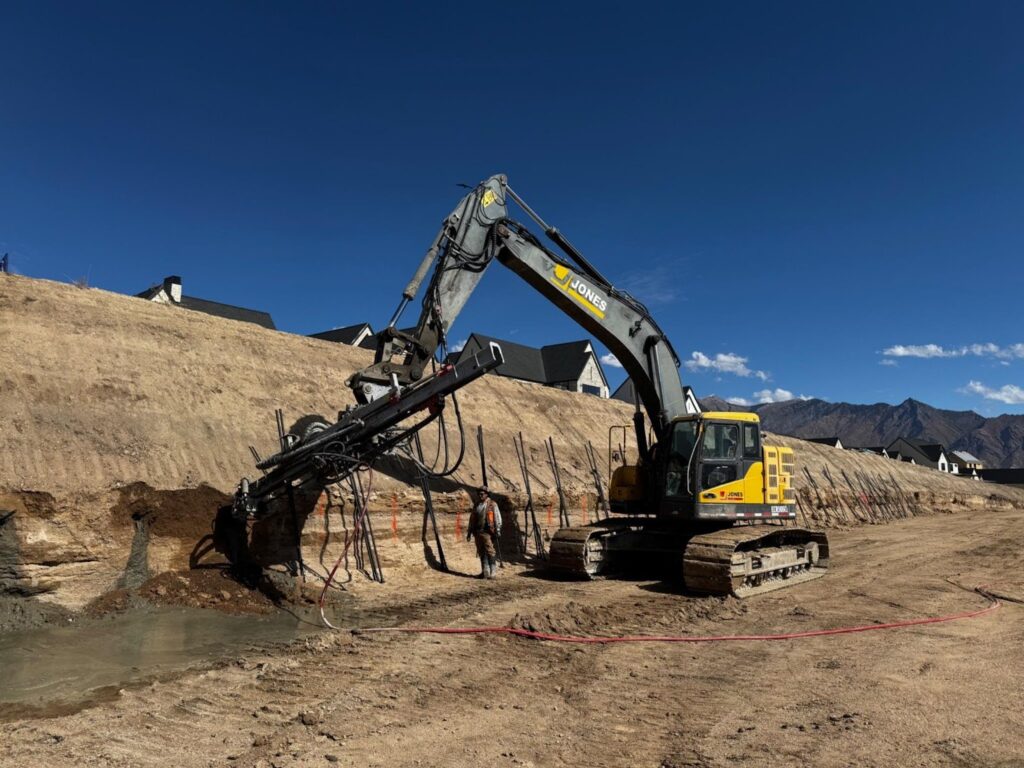
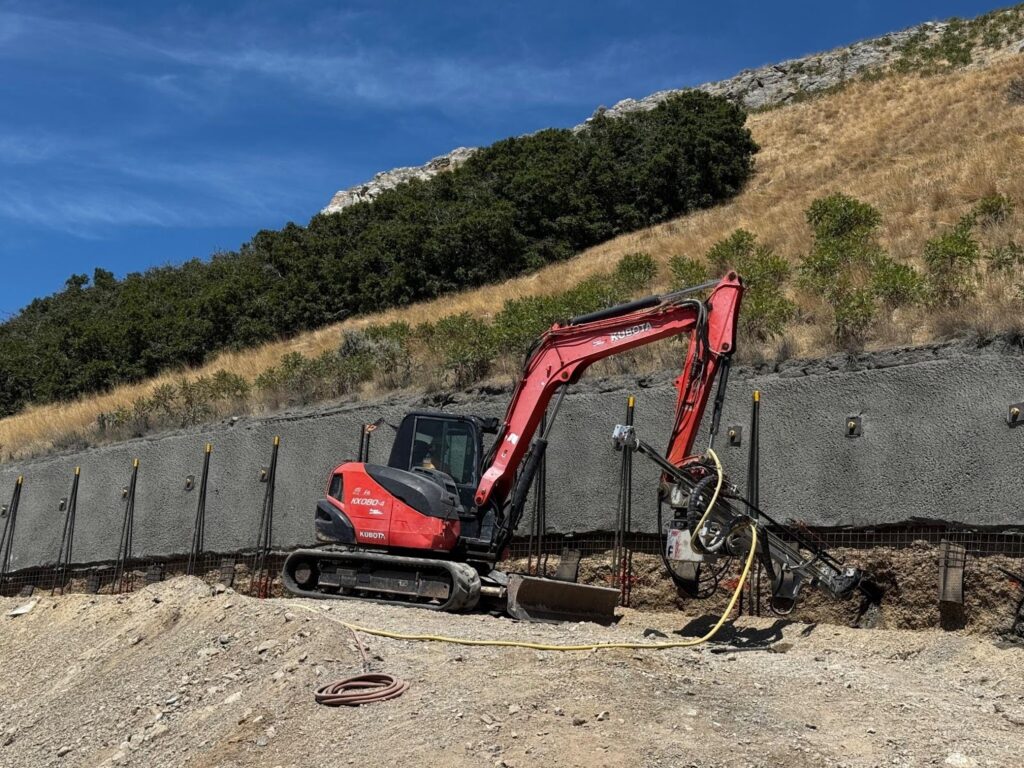
Western Equipment Solutions recently hosted the 2025 Hollow Bar Seminar in Salt Lake City, Utah, bringing together contractors, operators, and industry professionals for hands-on training focused on people, safety, and real-world installation practices.
Building on that momentum — and in recognition of both the Salt Lake City seminar and the Hollow Bar School in Montrose, Colorado — this blog breaks down the complete, step-by-step process for installing hollow bars using TEI Rock Drill foundation drilling equipment, covering everything from drill string assembly and grouting fundamentals to safe operation and proper finishing techniques.
Western Equipment Solutions hosted this year’s Hollow Bar Seminar in November 2025 in Salt Lake City, Utah, with a strong focus on people, safety, schools, and hands-on training.
The event covered critical topics, including proper hollow bar installation methods, bidding on hollow bar projects, and correct grouting techniques, providing attendees with practical knowledge they could apply directly in the field.
In addition, Western Equipment Solutions participated in the annual Hollow Bar School in Montrose, Colorado, where the team supported both hands-on field training and technical classroom instruction. They assisted with hands-on training using TEI drilling rigs and grout plants and contributed to in-depth technical presentations.
In today’s blog, in honor of the Hollow Bar Seminar, we’re learning in-depth about how to install hollow bars with TEI Rock Drill’s foundation drilling equipment and TEI drilling attachments. Keep reading to learn more.
How to install hollow bars
- Review controls and equipment setup
Inspect radio control functions and confirm the grout plant is set up correctly before beginning any drilling work.
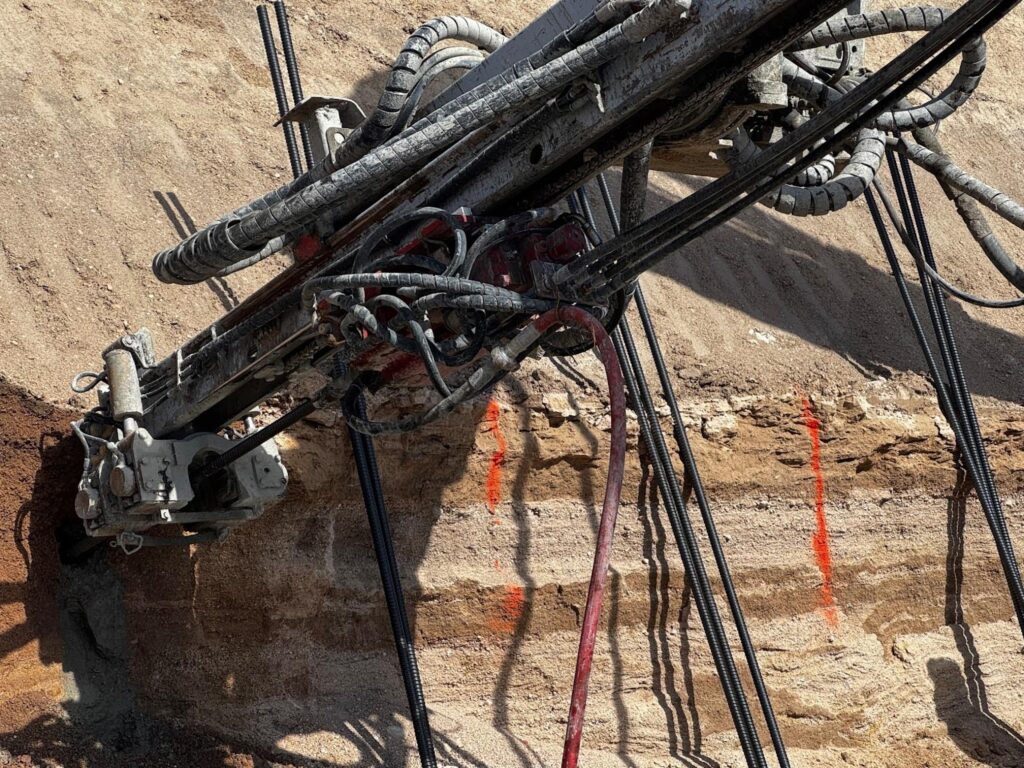
- Assemble the drill string
Connect the grout plant to the TEI drifter using a hose with a minimum diameter of 1 inch and the appropriate pressure rating. Apply bit grease to the shank and coupling only, then run the drill to the top of the mast and carefully rotate onto the coupling while a helper stabilizes the drill steel.
- Position the clamp and centralizer
Clamp the hollow bar above the bit and use the clamp as a centralizer when starting the hole to maintain proper alignment.
- Collar the hole correctly
Start pumping from the grout plant, confirming positive grout flow from your bit. Slightly open the clamp and start rotating the drill string. Then, fully open it after the first five feet to prevent excessive wear on the clamp pads.
- Begin drilling with proper settings
Turn on grout flow and confirm it is steady. Set the rotation between 60 and 80 RPM and slowly feed the bit into the hole, monitoring the grout returns.
- Manage drilling progression
Apply appropriate feed pressure and add percussion assistance if required. Back off the bit every two to three feet to plunge the hole to clear cuttings and confirm consistent grout flow.
- Monitor grout performance
Expect grout permeation into the surrounding soil and stay focused on what is happening at the bit throughout the drilling process.
- Add additional hollow bar sections
Drill the coupling into the clamp, secure it, then reverse the rotation to unthread. Add another bar and coupling before resuming drilling once the grout flow returns.
- Respond to grout flow issues
If grout flow stops, stop advancing the drill, keep rotation on, and wait for grout to return. If needed, plunge the drill string, switch to thick grout, or use quick-set grout additives.
- Follow strict grout plant safety practices
Spray down the grout plant with form oil before operation, keep all safety panels in place, and wear proper PPE, including goggles, ear protection, a respirator, gloves, and appropriate clothing.
- Finish the installation properly
Complete the installation using best practices to ensure performance, consistency, and long-term reliability.
How to assemble the drill string
- Connect the grout plant to the drifter
Use a hose with a minimum diameter and proper pressure rating of one inch to ensure proper grout flow during drilling.
- Apply bit grease correctly
Grease the shank and coupling only. Do not apply grease to the bit.
- Position the drill at the top of the mast
Run the drill to the top of the mast while a helper stabilizes the drill steel and coupling, paying close attention to hand placement for safety.
- Thread onto the coupling
Slowly rotate the drill onto the coupling to secure the connection before proceeding.
- Clamp the hollow bar
Clamp the hollow bar above the bit to maintain proper alignment and control.
- Maintain system awareness and communication
Think through the entire system and maintain clear, consistent communication with the grout plant operator throughout the installation.
How to collar the hole
- Use the clamp to grip and centralize.
The clamp secures the bars and couplings and also acts as a centralizer when starting the hole.
- Start with the clamp fully engaged.
Begin pumping grout with the clamp completely closed to maintain alignment and control.
- Slightly open the clamp after drilling begins.
Slightly open the clamp as drilling progresses.
- Fully open the clamp after the first five feet.
Open the clamp completely to prevent unnecessary wear on the clamp pads.
How drilling progression should work
- Turn on grout flow.
Start with the grout flow on and verify that it is steady and even before drilling begins.
- Set rotation speed.
Set the rotation between 60 and 80 RPM to maintain proper drilling performance.
- Feed the bit into the hole.
Slowly advance the bit into the hole while monitoring drilling conditions.
- Monitor grout returns.
Watch closely to ensure grout returns remain constant throughout drilling.
- Add percussion assistance when needed.
Use percussion to support rotation when ground conditions require it.
- Clear cuttings regularly.
Back off the bit every two to three feet and plunge the hole to clear drill cuttings above and below the bit and to confirm grout flow.
- Keep rotation engaged.
Maintain rotation at all times and stay focused on what is happening at the bit during drilling.
Grouting and grout return
- Drill using thin grout.
Use thin grout during drilling to act as the drilling fluid, allowing the grout to permeate the surrounding soil.
- Monitor grout returns continuously.
Watch the grout returns at all times to confirm proper circulation.
- Keep the hole clear.
Assign a helper to remove drill cuttings and excess grout from the top of the hole using a shovel.
- Stop drilling if the grout return stops.
If the grout return is lost, stop feeding but maintain rotation and continue only after reestablishing the grout return.
- Plunge before adding a new bar.
Plunge the full hole four to five times to maintain grout circulation before adding another hollow bar.
- Switch to thick grout at the final depth.
Once you reach the final depth, switch to thick grout to complete the installation.
- Plunge to finish the hole.
Plunge the hole six to eight times while watching for clean, consistent grout returns.
Adding hollow bars
- Drill the coupling below the clamp.
Advance the coupling as far as the feed allows.
- Secure the coupling with the clamp.
Pull back slightly from the bottom of the hole and clamp the coupling in place.
- Reverse rotation to disconnect.
Slowly reverse rotation to unthread the drifter from the coupling.
- Retract the drifter.
Run the drifter back to the top of the feed once disconnected.
- Add the next bar and coupling.
Thread on another hollow bar and coupling.
- Resume drilling properly.
Open the clamp, turn the rotation back on, and continue drilling only after grout flow is clearly returning from the hole.
Finishing the hole
- Plunge the hole to finish.
Plunge the hole six to eight times using the thick grout mixture to complete the installation.
- Remove the last coupling.
Rattle the last coupling off the bar once plunging is complete.
- Install casing if required.
Push the casing over the bar when the application requires it.
- Retract the feed.
Extend the feed off the hole after installation is complete.
- Move the excavator arm safely.
Swing the excavator arm away from the hole while carefully avoiding contact with the clamp.
- Center the bar in the hole.
Align the bar correctly to ensure a clean finish and correct installation.
Benefits of hollow bars
Hollow bars offer several key benefits that make them a preferred solution for ground reinforcement, micropiles, and soil nailing projects:
- Faster installation: Hollow bars enable drilling and grouting in a single operation, which accelerates the installation process and reduces labor time.
- Improved grout penetration: Grout flows through the hollow core and exits at the bit, permeating the surrounding soil more evenly for stronger load transfer.
- Versatility in ground conditions: Hollow bars perform well in loose, collapsing, or variable soils where conventional casing or solid bars struggle.
- Reduced need for casing: Because the bar itself stabilizes the hole during drilling, hollow bars often eliminate the need for temporary casing.
Get your TEI Rock Drill equipment from Western Equipment Solutions
When your projects demand precision, reliability, and proven performance, partner with Western Equipment Solutions for all your TEI Rock Drill foundation drilling equipment needs. From hollow bar systems and TEI drilling attachments to expert guidance and field support, our team delivers solutions that keep your crews productive and your jobs moving forward.
Western Equipment Solutions has worked with TEI Rock Drills for years. Craig Berninger, our Sales Manager, says, “TEI is the best manufacturer of drill attachments, hydraulic percussion drills, limited access drills, and components due to their in-house engineering, earned patents, and ISO-certified manufacturing facility.”
Craig further states, “I have been working with TEI, a family-owned manufacturing business, since 2012. TEI treats each of its employees, dealers, and customers as family. I am proud to be part of a USA manufacturing family.”
Contact Western Equipment Solutions today to learn more about available TEI Rock Drill equipment, TEI drilling attachments, training resources, and service support across the Western U.S. and Canada. Let’s ensure your next drilling project begins with the right equipment and the right partner.